Sooner or later every webmaster gets to the point where he/she needs to collect some kind of data from his/her website’s visitors - the most common, and probably technically simplest, task would be collecting visitors’ email addresses by creating some kind of newsletter subscription form on web page. However, since that task is in most cases solved as a part of mailing list service would not make much sense to use it in this article, so we will create small application for adding various events to an Excel workbook.
Although many programmers would say that Excel workbook can hardly be called database (and they would be right to some degree) we will still choose it because of its simplicity compared to anything else that can be used for storing data.
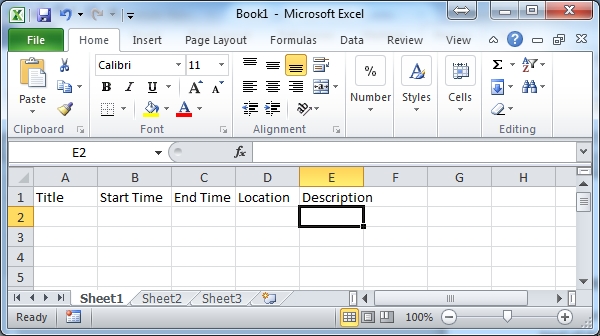
Start your copy of Microsoft Excel, and enter names of the fields in first row as shown on following picture:
Double-click "Sheet1�? tab and rename it to "Events�?:
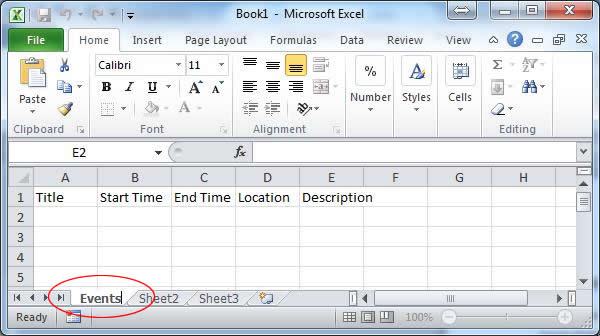
By doing this we actually created a table named "Events�? with five fields named "Title�?, "Start Time�?, "End Time�?, "Location�? and "Description�?.
Save the workbook as events.xls (select "Save as type:�? Excel 97-2003 Workbook) .
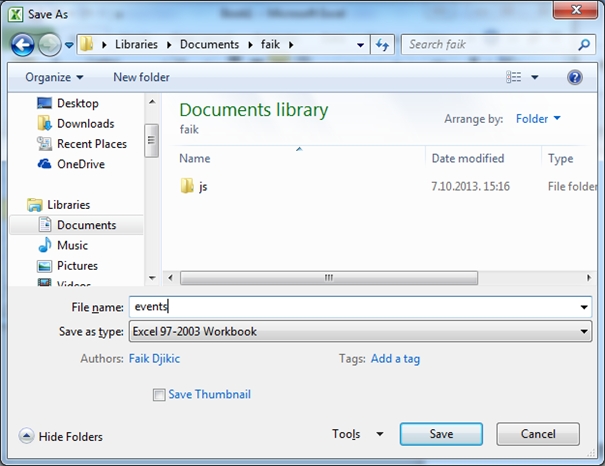
WhizBase works perfectly with all versions of Excel (including 2010 xlsx format), but in this case we will use 97-2003 format as simpler to configure.
This concludes creating our "database�?.
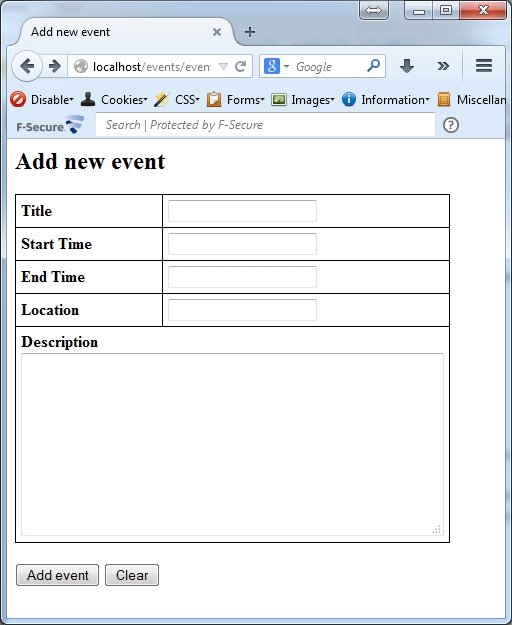
Following is plain HTML code for page containing input form. Please read the comments marked with green italic font and enclosed in <!--and -->
<html>
<head>
<title>Add new event</title>
</head>
<body>
<h2>Add new event</h2>
<!-- This is regular HTML document with regular HTML form having text input fields that are named following WhizBase syntax.
Form fields of type text and textarea are named same as database fields for which they should collect data, with prefix WBF_ added. This tells WhizBase how to associate form field data with database fields. -->
<form action="eventsadd.wbsp" method="POST">
<!-- eventsadd.wbsp is script that will accept data posted by this form and add new record in the database. More about it in the follwing part.-->
<table border="1" cellspacing="0"" cellpadding="5" style="border-collapse: collapse" bordercolor="#000000" bgcolor="#FFFFFF">
<tr>
<td><strong>Title</strong></td>
<td><input type="text" name="WBF_Title" value=""></td>
<!--data entered in this field will be saved to the database field named "Title"-->
</tr>
<tr>
<td><strong>Start Time</strong></td>
<td><input type="text" name="WBF_Start Time" value=""></td>
<!--data entered in this field will be saved to the database field named "Start Time"-->
</tr>
<tr>
<td><strong>End Time</strong></td>
<td><input type="text" name="WBF_End Time" value=""></td>
<!--data entered in this field will be saved to the database field named "End Time"-->
</tr>
<tr>
<td><strong>Location</strong></td>
<td><input type="text" name="WBF_Location" value=""></td>
<!--data entered in this field will be saved to the database field named "Location"-->
</tr>
<tr>
<td colspan="2"><strong>Description</strong><br/>
<textarea name="WBF_Description" cols="50" rows="10"></textarea>
<!--data entered in this field will be saved to the database field named "Description". This field is meant to accept large data, so we use input field of type textarea for easier typing-->
</td>
</tr>
</table>
<br/>
<input type='submit' value='Add event'> <input type='reset' value='Clear'>
</form>
</body>
</html>
Finished form should look like this in the browser:
This is the core of whole application. This script connects HTML form and Excel workbook by saving user’s input in Excel sheet. Without this element web server would not know what to do with data entered by visitor, and they would never reach the database, yet it is very simple to build and easy to understand. Comments are marked with green italic font and enclosed in . WhizBase elements are in bold blue font.
[FormFields]
WB_BaseName=events.xls #*this is the name of the Excel file that will be used for this operation*#
WB_Connect=Excel 8.0;#*this line tells WhizBase that above file is in Excel 97-2003 format*#
WB_Command=A #* wb_command set to "A" tells WhizBase to create (add) new record*#
WB_RcdSet=[Events$] #*This line tells WhizBase to add records to table named "Events"*#
WB_TempName=$default$ #*This line tells WhizBase to use automatically generated report template to display added data*#
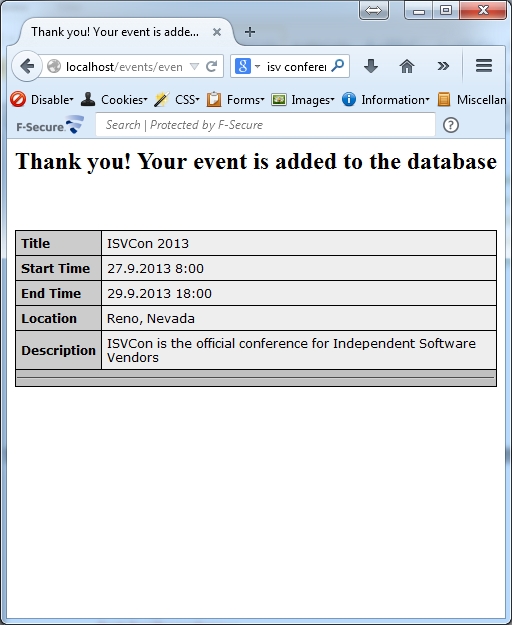
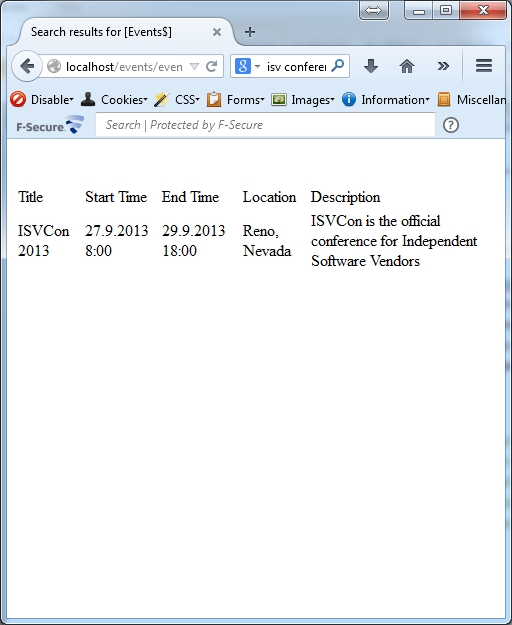
And that would be all that is required for collecting the data about upcoming events from your visitors on-line. Upon adding record visitor will see something like this:
For more sophisticated report we could modify the code like this:
[FormFields]
WB_BaseName=events.xls #*this is the name of the Excel file that will be used for this operation*#
WB_Connect=Excel 8.0; #*this line tells WhizBase that above file is in Excel 97-2003 format*#
WB_Command=A #* wb_command set to "A" tells WhizBase to create (add) new record*#
WB_RcdSet=[Events$] #*This line tells WhizBase to add records to table named "Events"*#
<!--WB_BeginTemplate--> #*This line separates configuration part from actual report. Only things BELOW this line will be sent to the client*#
<html>
<head>
<style>
.wbspftbl{
border:1px solid #000000;
font-family:verdana;
font-size:12px;
border-collapse:collapse;
border-spacing:0px;
}
.wbsptdlbl{
background-color:#CCCCCC;
border:1px solid #000000;
color:#000000;
padding:5px;
}
.wbsptdfld{
background-color:#EEEEEE;
border:1px solid #000000;
color:#000000;
padding:5px;
}
.wbsptdhr{
background-color:#C0C0C0;
}
</style>
<title>Thank you! Your event is added to the database</title>
</head>
<body>
<h2>Thank you! Your event is added to the database</h2>
$wbdetail[F]
</body>
</html>
This modification is purely cosmetic has no influence on record creation, but only to the way data would be presented as confirmation what has been added. However, one must admit it will look much better: